6a62b8eeb9a56
AlumniFinder Online User Guide
AlumniFinder Search, located within the AlumniFinder Online portal, is designed specifically for development and fundraising professionals to easily research donors or alumni. With AlumniFinder Search, you’ll be able to quickly locate updated contact information such as your prospect’s most recent address, telephone number, and more.
This guide will help you to get started with the basic functions of AlumniFinder Online. We’ll cover the following topics:

If you requested an AlumniFinder Online account on the site, simply log in with the username and password you created once your account has been approved.
If you requested access to AlumniFinder Online from your Organization Administrator or directly with the AlumniFinder team, you will be provided your username and a temporary password. You will be prompted to reset your password upon logging in for the first time.
Upon logging in, a “Secure Data Alert” window will display. You will be prompted to authenticate your identity in order to access full Date of Birth information by entering a code that has been sent to your email address. Enter the provided code into the “Enter Authentication Code” field and then click the green “Authenticate” field. If Date of Birth data is not relevant to your research, you may skip this step.
You will now be on AlumniFinder Search tab, which is defaulted to display the Person Search (Premier) Screen. Before we demonstrate a search, we’ll review the site’s navigation.
To explore AlumniFinder Online solutions, click on the tabs to learn more about the different options for finding and reaching your donors and alumni: Data Quality Report, Batch & Data Resources, Wealth & Analytics, and Digital & Database Solutions.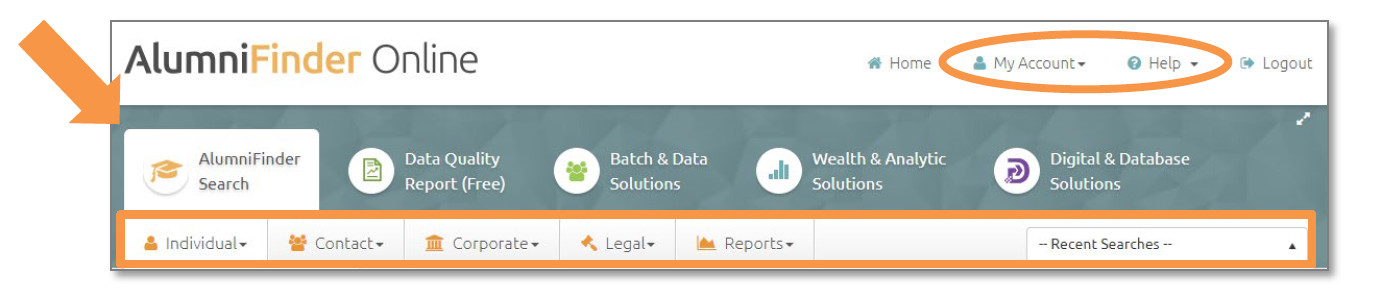
Help Option
Please note the Help option at the upper right-hand side of the screen. Along with this guide, AlumniFinder has created demonstration videos for using the platform and other helpful resources for new users. Click “Help” to proceed.
My Account
The My Account section is where you can find essential account-related information and functions including pricing, user settings, site default options, and more.
Search Menus
Immediately below the AlumniFinder Search tab, you will find five menus that offer searches and features: Individual, Contact, Corporate, Legal, and Reports. Below is a brief summary of each menu option.
- Individual: includes the Person Search (Basic) and Person Search (Premier)
- Contact: includes Contact Plus Search, Email Search, Employment Search, Phone Search (Basic),
Phone Search (Premier), Reverse Phone Search, Social Media Search, and Voter Search - Corporate: includes the Company Search
- Legal: Aircraft Search, Bankruptcy Search, Professional License Search, Property Search
(Assessment), Property Search (Deed), Deceased Search, Judgment Search, Marriage Search,
and Watercraft Search - Reports: a repository that captures all of the reports you have generated when performing
prospect research
Let’s begin with the My Account menu.
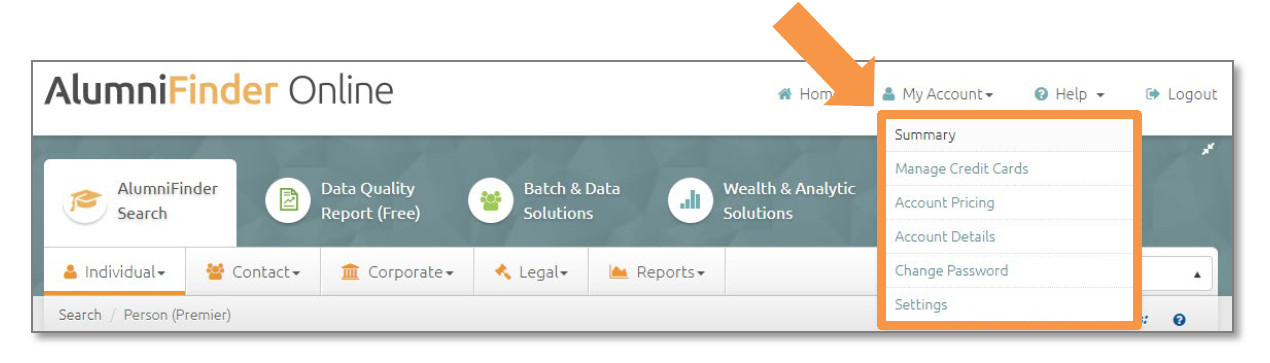
My Account
Summary
The Summary shows you basic information about yourself and your organization. It also shows you the
types of searches you can perform in AlumniFinder Search. Admins can edit the searches available for
each user in a different menu of My Account.
Within the Summary section, you will also see an “Authentication” section. AlumniFinder Search requires a 2-factor identification process for users to gain access to Date of Birth data. New users will receive this prompt during their first logon. If they choose to authenticate at that point, they will be asked to do so again every 90 days.
If you are a returning user that skipped the initial authentication process, you may authenticate any anytime by clicking “Edit” within the “Authentication” section. Upon clicking, a code will be mailed to you. Please enter that authentication code in the “Enter Authentication Code” field on the “Secure Data Alert” pop up window and then click the “Authentication” process to finish. Once this process is complete, you will have full access to Date of Birth data on AlumniFinder Search.
If Date of Birth data is not relevant to your research, you may skip this step.
Manage Credit Cards
The Manage Credit Cards section allows you to add and delete the credit card information associated with your account. To add a new credit card, click the blue “Add a Credit Card” link found at the top of the screen or the blue “+Add” button on the right hand side of the screen. You’ll be redirected to a form to fill out your credit card information. Please carefully complete all of the required fields and then press the “Save” button at the bottom of the screen. If you want to “Delete” an existing card, simply click on the blue trashcan icon.
Account Pricing
The Account Pricing section will show you the pricing information for each search and report available.
Account Details
The Account Details section allows you to edit the information about yourself or your organization. Fill in email, phone number, address and any other important details here.
Change Password
If you need to reset your password, you’ll need to enter your previous password and security question to make the change. Your Admin can also assist with password changes.
Settings
The Settings section will allow you to customize key default selections so that AlumniFinder Search functions in a way most relevant to your research. Options include setting a default search and hiding the product menus.
AlumniFinder Online defaults to Person Search (Premier). Person Search (Premier) is more targeted than the Basic search option and will return a more concise list of results. Some of the differences you’ll experience with Person Search (Premier) include the option to search for name variations as well as to search with middle names/initials, full addresses, and phone number history.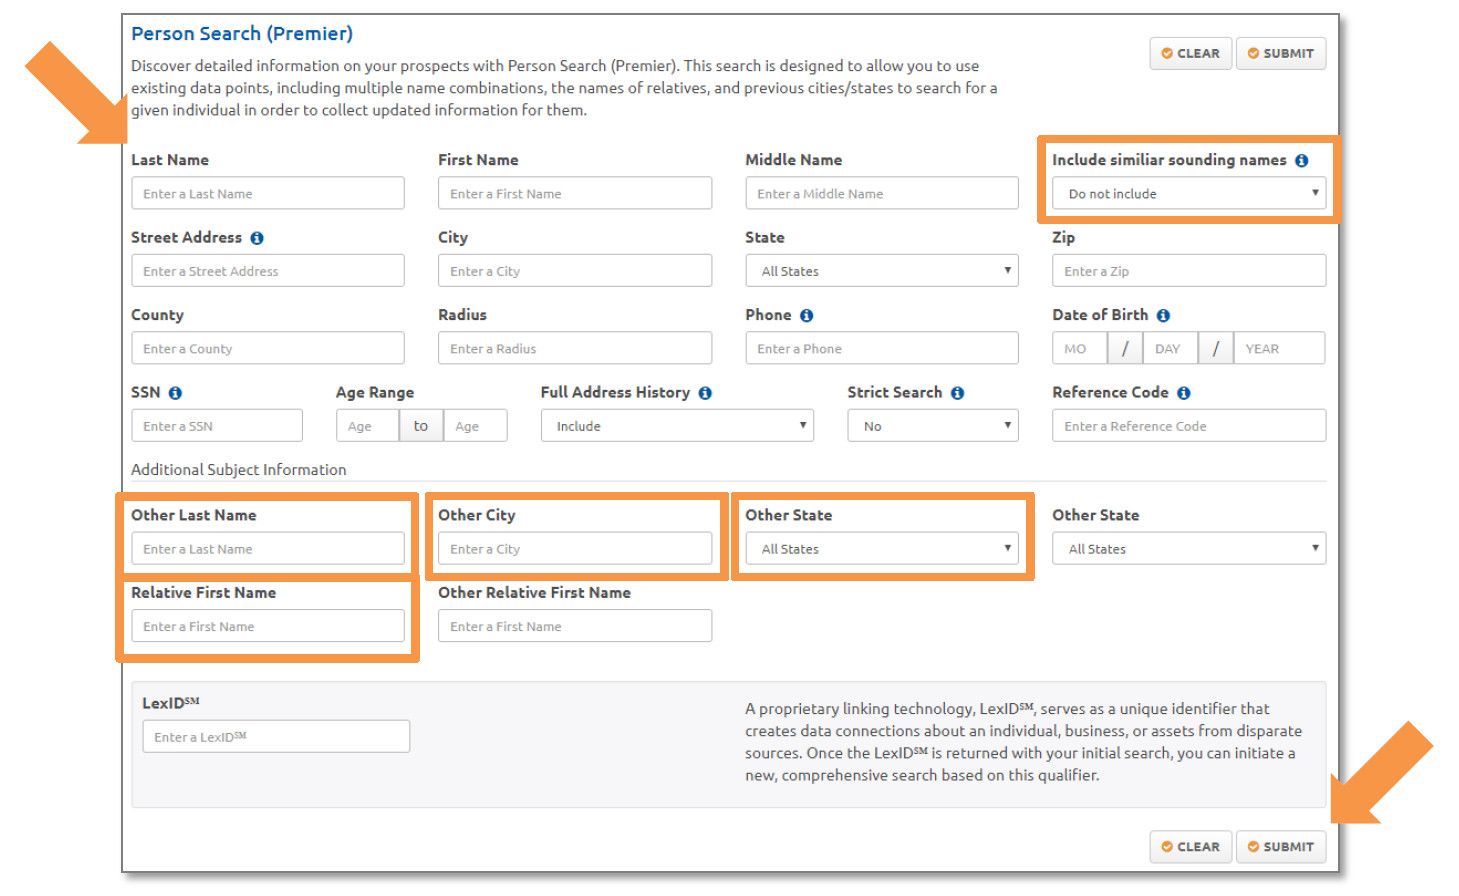
We recommend beginning your search with the Last Name and First Name fields completed. To further refine your search, consider using the following:
Other Last Name
Enter the individual’s maiden name or an alias into the Other Last Name field in combination with the Name Fields.
Include Similar Sounding Names
If you’re not sure of the correct spelling of a person’s name (for example Brian vs. Bryan), you can choose this option to pull results that include different name spellings. This will make it easier for you to identify the right person, even if you’re not confident about the spelling of a first or last name.
Other City/Other State
Search by using the Name fields and current state of residence as well as any previous state or states where the individual may have resided. This search can also be performed by using the Name fields and the current city of residence as well as a past city of residence. Select “Include” in the Full Address History field for full address results.
Relative First Name
If you know the first name of a relation, use the Relative First Name/Other Relative First Name fields in combination with the Name fields.
Once you have entered the desired search criteria, click the “Submit” button at the bottom right side or top right side of the screen to perform your search. When the search runs, you’ll be presented with information about the individuals that match the information you have entered.
Here is an example of the type of information you will see: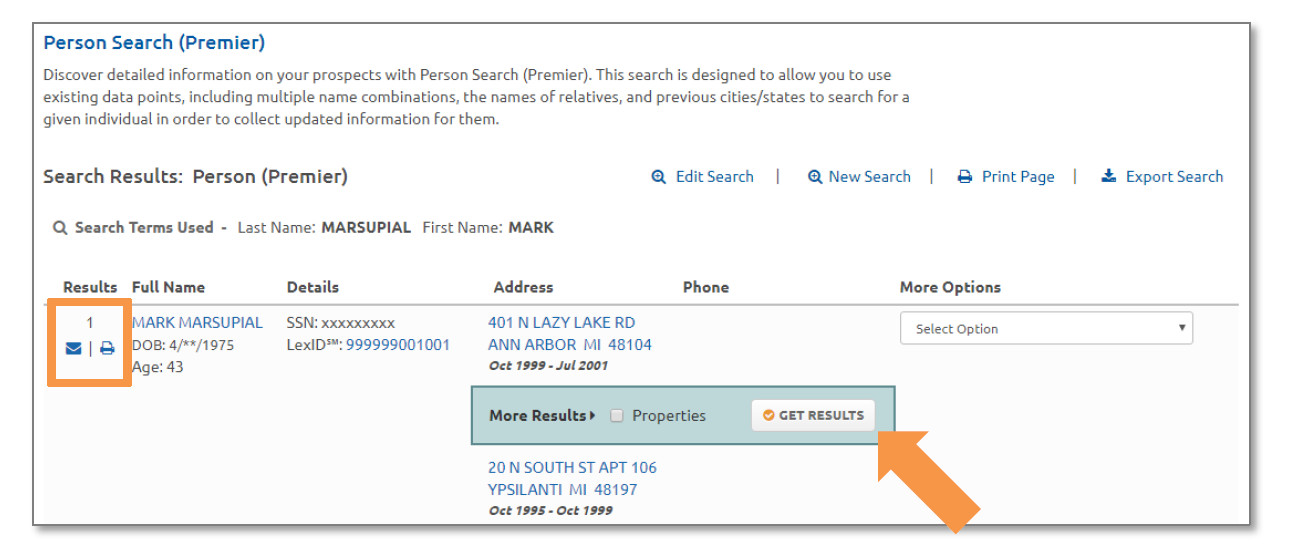
From the search results, you’ll be able to see additional information such as past address history (along with the dates when the person lived at each address), date of birth, and age. Additional fields you might see include gender, a label indicating a person’s most likely current address, the time zone an individual is living within, and a note if the person is deceased.
More Results
More Results offers a quick way to obtain additional information on your prospect, including an email address, telephone number, property information, and donation details.
Please note that under the “Results” column, you have the ability to email or print the results of the search. Next, we’ll introduce the Person Search (Basic) and conclude with running and working with reports.
To access Person Search (Basic), hover over the “Individual” tab and select “Person Search (Basic).” This search is designed to help you find updated information about your prospect. Please note that this search offers broader, more generalized results and will return a larger list of potential matches.
If you already have a prospect’s LexID, this is the quickest way to find any person available in the database; but there are several other methods that you can use as well. Here are the recommended ways to narrow your results and identify a prospect using Person Search (Basic):
SSN and Last Name/First Name
Use the Last Name, First Name, State, and City (if available). Partial first names can also be used. Consider adding additional criteria, including the Middle Name (or middle initial), Street Address, Date of Birth, Age Range, or Zip code to further refine your search.
Phone
Phone searches (cell or landline) can be performed with or without an area code. If not using an area code, consider adding Name and/or State fields to return more precise results.
Date of Birth
Use the full or partial Date of Birth (DOB) along with the Name fields. The DOB may be entered as Month/Day/Year, Month/Year, or Year alone.
Like the search results from Person Search (Premier), you’ll be able to see additional information such as past address history (along with the dates when the person lived at each address), date of birth, and age. Additional fields you might see include gender, a label indicating a person’s most likely current address, the time zone an individual is living within, and a note if the person is deceased.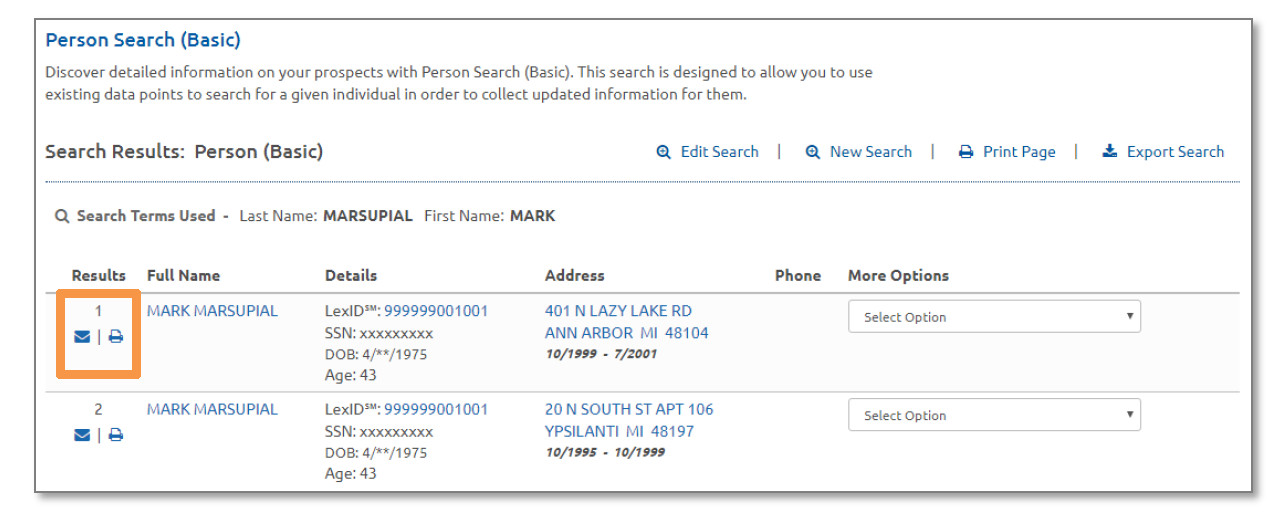
AlumniFinder Search allows you to generate a detailed Summary Report about your prospect. Reports are designed to be easy to use, simple to read, and to include only the most relevant information. Creating a report takes just a few steps.
Step 1: Identify your donor
Using either of the Person Search options, enter your criteria and submit the search.
Step 2: Selecting “Generate Report”
Once your search results are listed, you’ll need to select the prospect that you would like to generate the report for. To do this, click on the “Select Option” drop-down menu on the right-hand side of the screen and then select the desired report.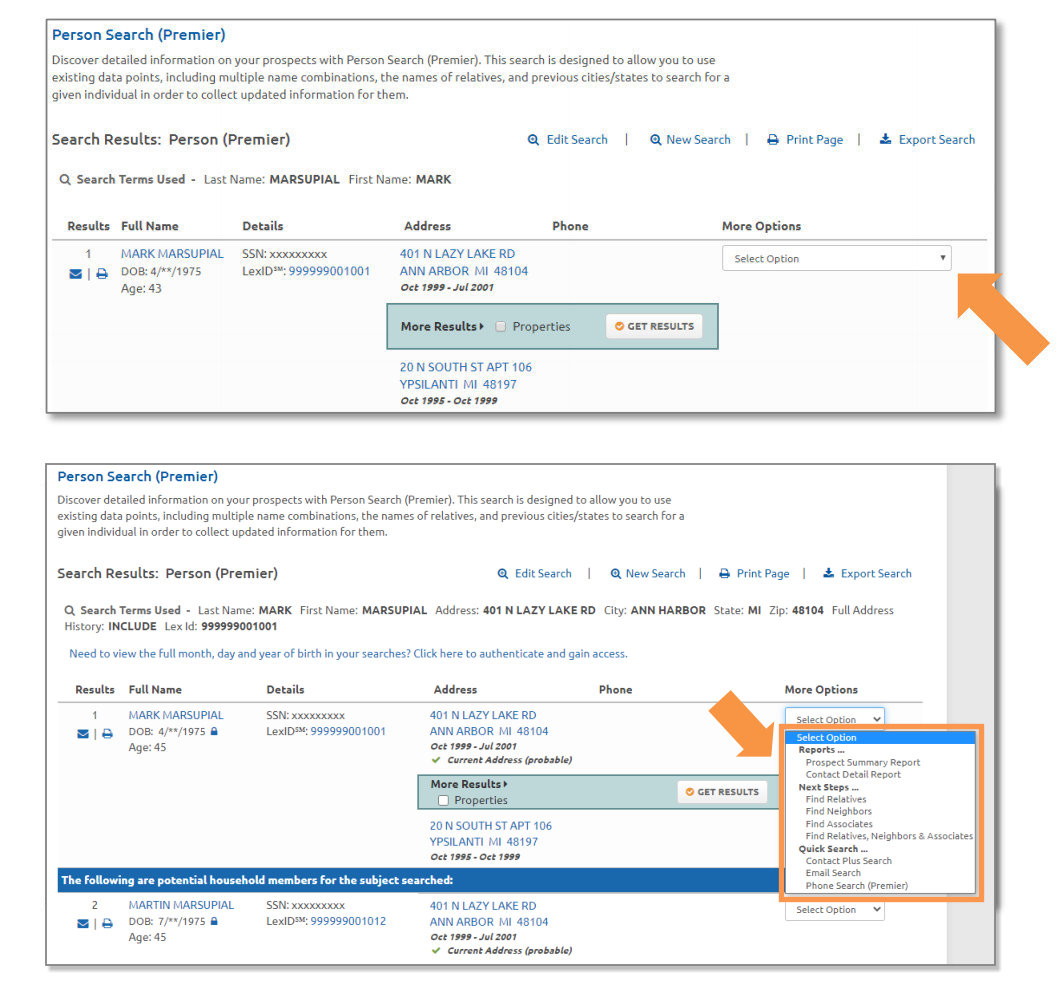
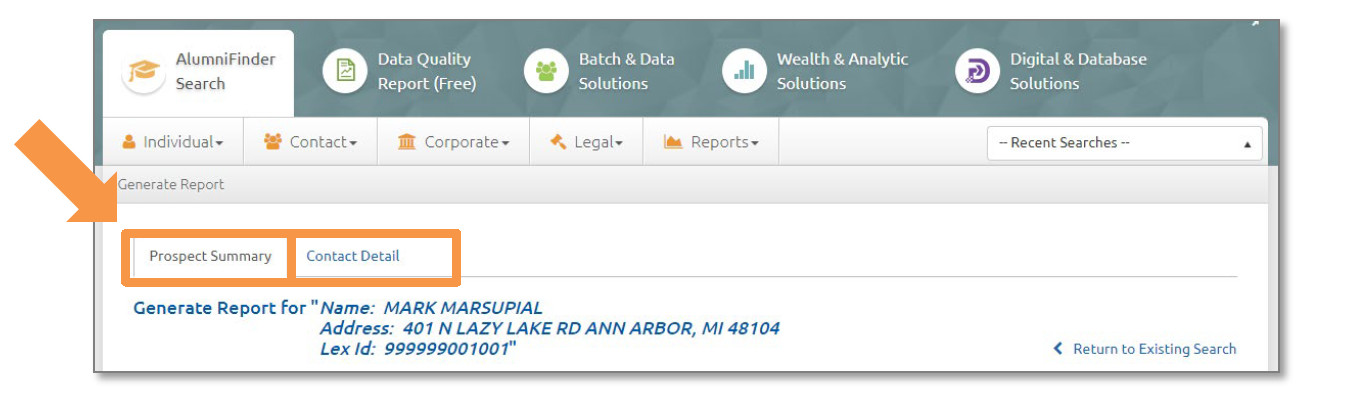
Step 3: Select the Information for Your Report
The Prospect Summary Report screen will display. You’ll also see a second tab for the Contact Detail Report. You may choose from the report that will best meet your prospect research needs.
- Prospect Summary Report: a comprehensive overview of your prospect that can be customized
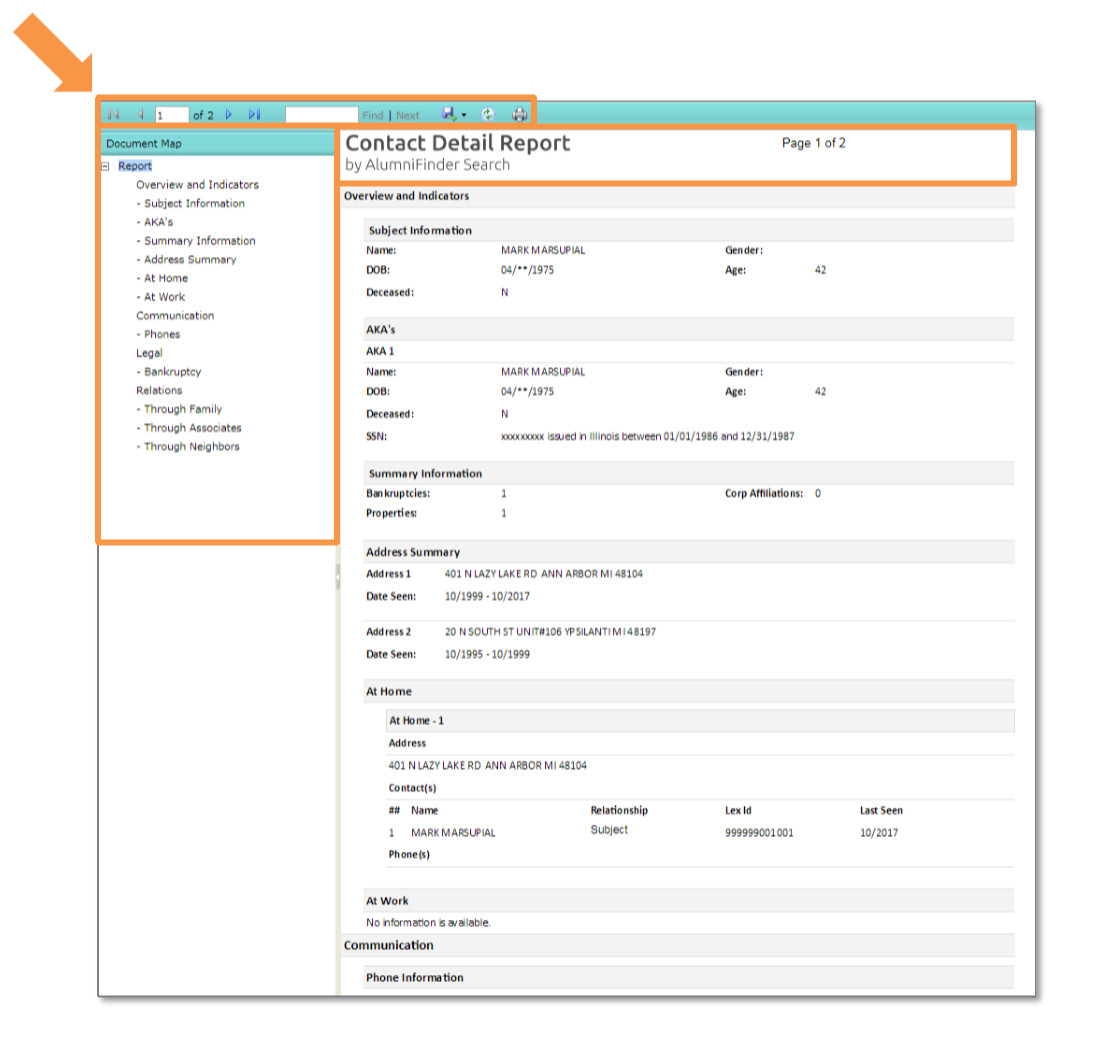
to display the data fields you require - Contact Detail Report: a report that highlights key contact details for your prospect
Both reports work in a similar fashion. You’ll see different categories of information that you can choose from to customize your report. If there is any information you don’t need, you can remove those attributes by simply unchecking the corresponding box. You can also adjust the number of records returned for some categories of information, such as Address Summary, Relations, and Watercraft in the Prospect Summary Report.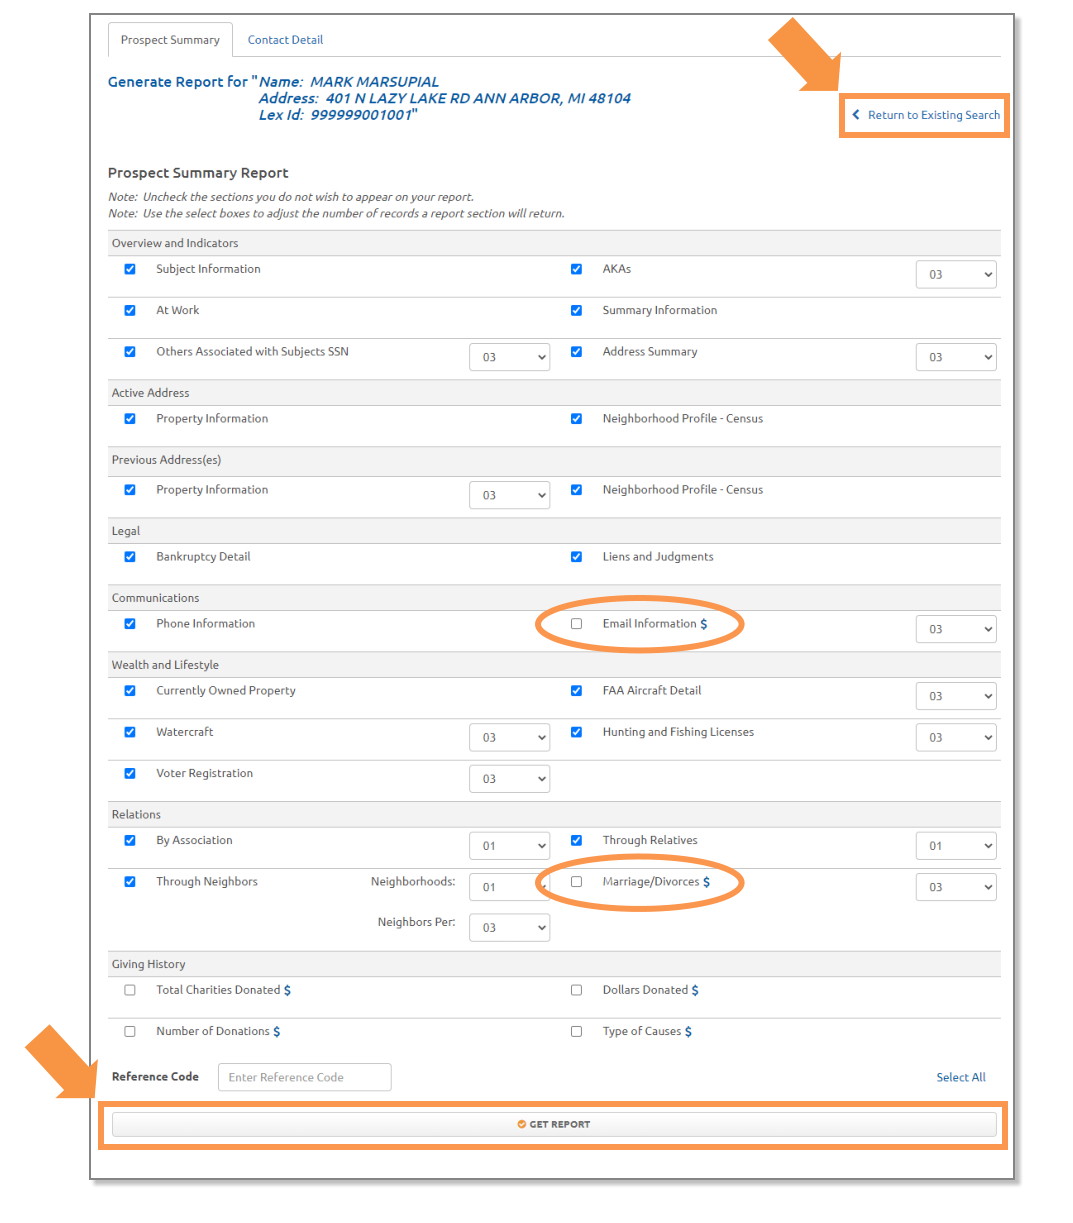
For an additional fee, email addresses and marital status can be added to your Prospect Summary Report; include these attributes by clicking the corresponding check boxes.
The Contact Detail Report

To generate your report, click the “Get Report” button at the bottom of the screen. To return to your existing search, click the “Return to Existing Search” link at the top of the page.
Step 4: Viewing Your Report
There are two ways to view your report. If you’ve allowed pop-ups within AlumniFinder Search, your report will automatically open for you in a new tab. If you haven’t allowed pop-ups, click once more to open your report.
If your report doesn’t open, click “Click here to view your report!” to open it manually. Adjust your settings in your internet browser to allow pop-ups from AlumniFinder Search to make this easier on future searches.
Step 5: Reviewing Your Summary or Contact Detail Report
When you open your report, there are three key areas you’ll want to focus on:
- The Document Map
- The Task Bar
- The Prospect Summary Report or Contact Detail Report
The Document Map appears on the left hand side of the screen and includes links to the attribute categories within your Report. The Task Bar is on the upper left hand side of the screen features actions that you can take within the reporting tool, including navigating from page to page, saving your report, and printing your report. Last, the actual Prospect Summary Report or Contact Detail Report appears within the middle of your screen. Here you will find all of the details on the prospect that you researched.
As you click through the information, the blue highlight in the left hand menu will change. You also can use the blue arrows in the turquoise menu bar at the top of the report to navigate the different pages of the report.
Examples of the Prospect Summary Report and Contact Detail Report follow.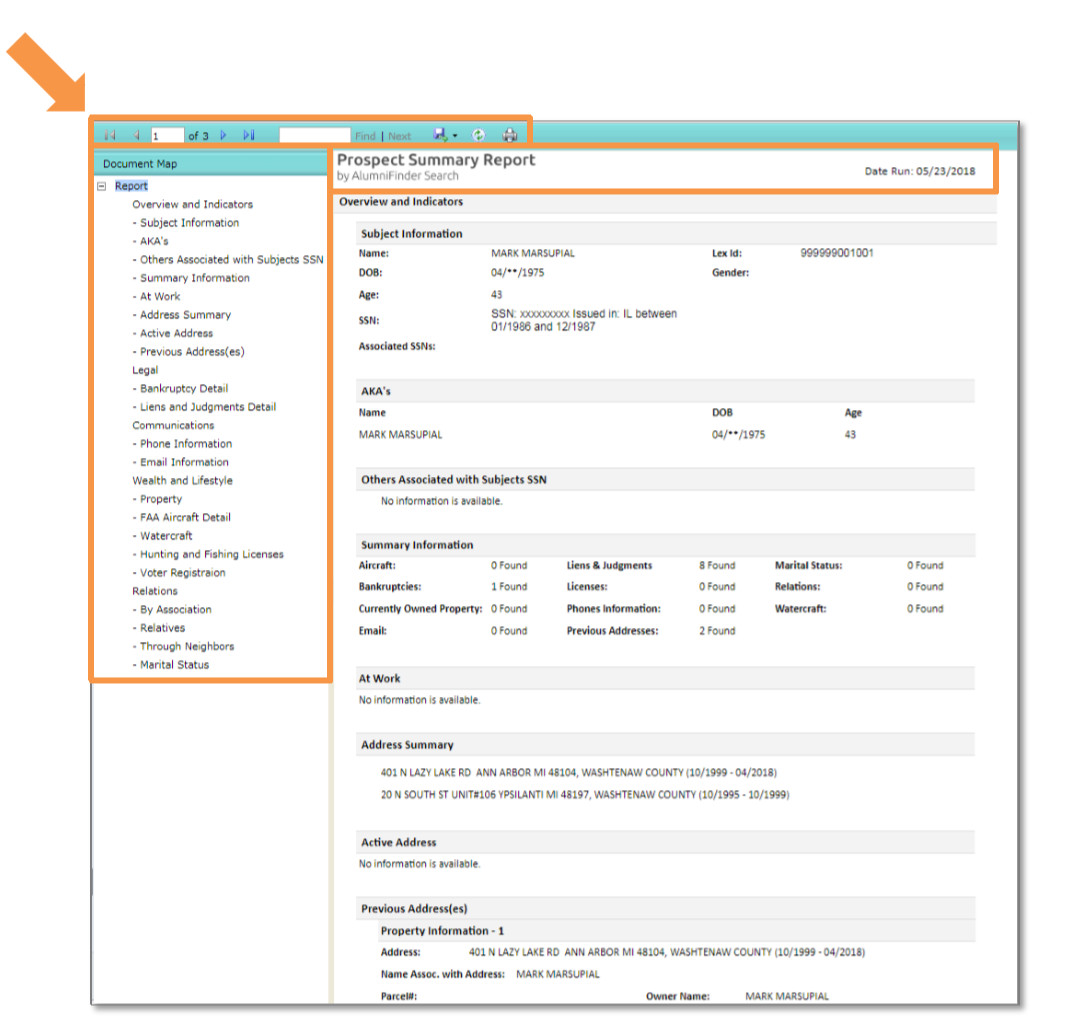
Recent Searches
AlumniFinder Search retains your previous searches in the easy to access “Recent Searches” menu found in the upper right hand corner of the screen. To view your recent searches, click the drop down menu and scroll to make your selection. You can also view all searches by clicking the “Show All Searches” option.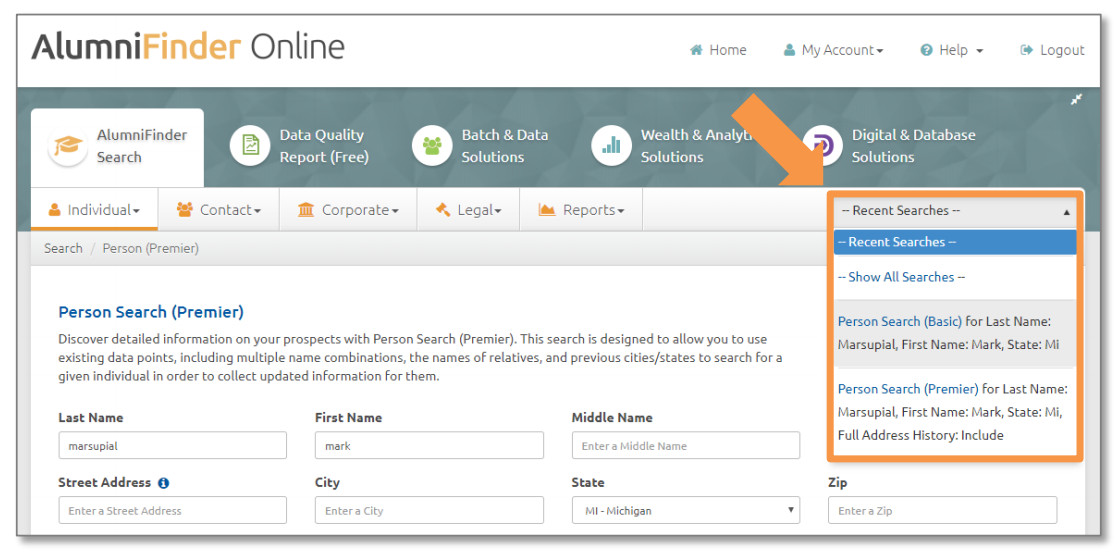
Upon making your selection, you will be returned to the Search Results page. From here, you can generate a Prospect Summary Report as well as view Next Actions (Find Neighbors, Associates, and Relatives) or launch a Quick Search (Contact Plus, Email, and Phone Premier). You also have the ability to edit the search or launch a new search.
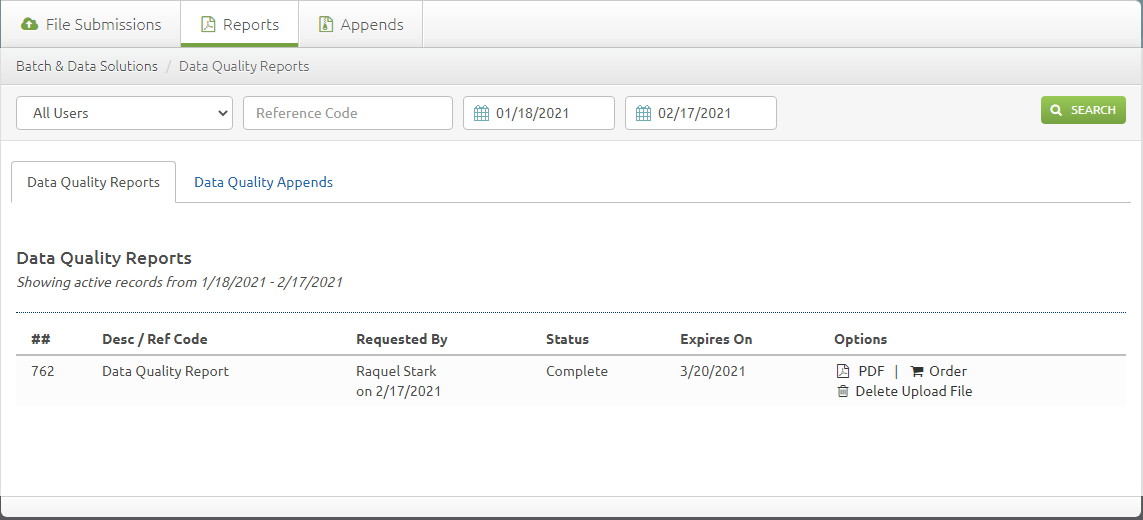
Viewing Past Reports
Another simple feature to retrieve information about a prospect is the Reports Library. By clicking on “Reports” you can see each report you’ve generated and download the corresponding information.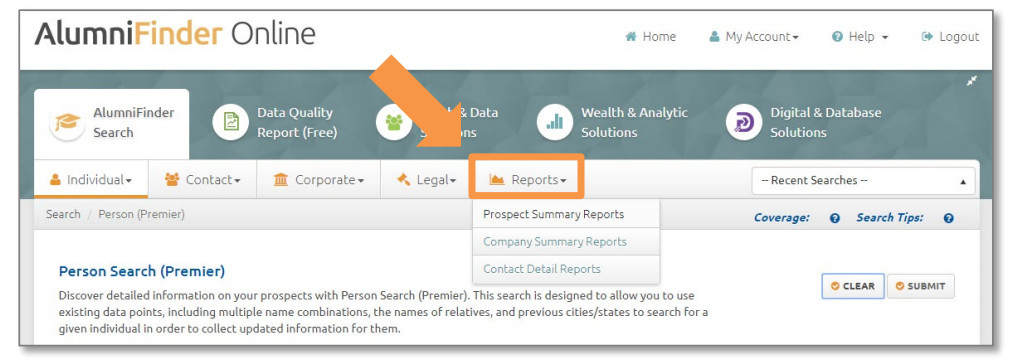
In Conclusion
AlumniFinder Search was designed to be user-friendly for fundraising professionals to quickly update key contact information. When you need to find postal addresses, phone numbers, or email addresses for prospects in your database, AlumniFinder Search is the ideal tool.
In the event that you have a large number of records that need to be updated, please inquire about AlumniFinder’s Batch service. With AlumniFinder Batch updates, you can update critical contact information on thousands of individuals in your database in a single pass. To learn more about AlumniFinder’s many products and solutions for development and fundraising professionals, please visit www.alumnifinder.com or call 888-732-0581.
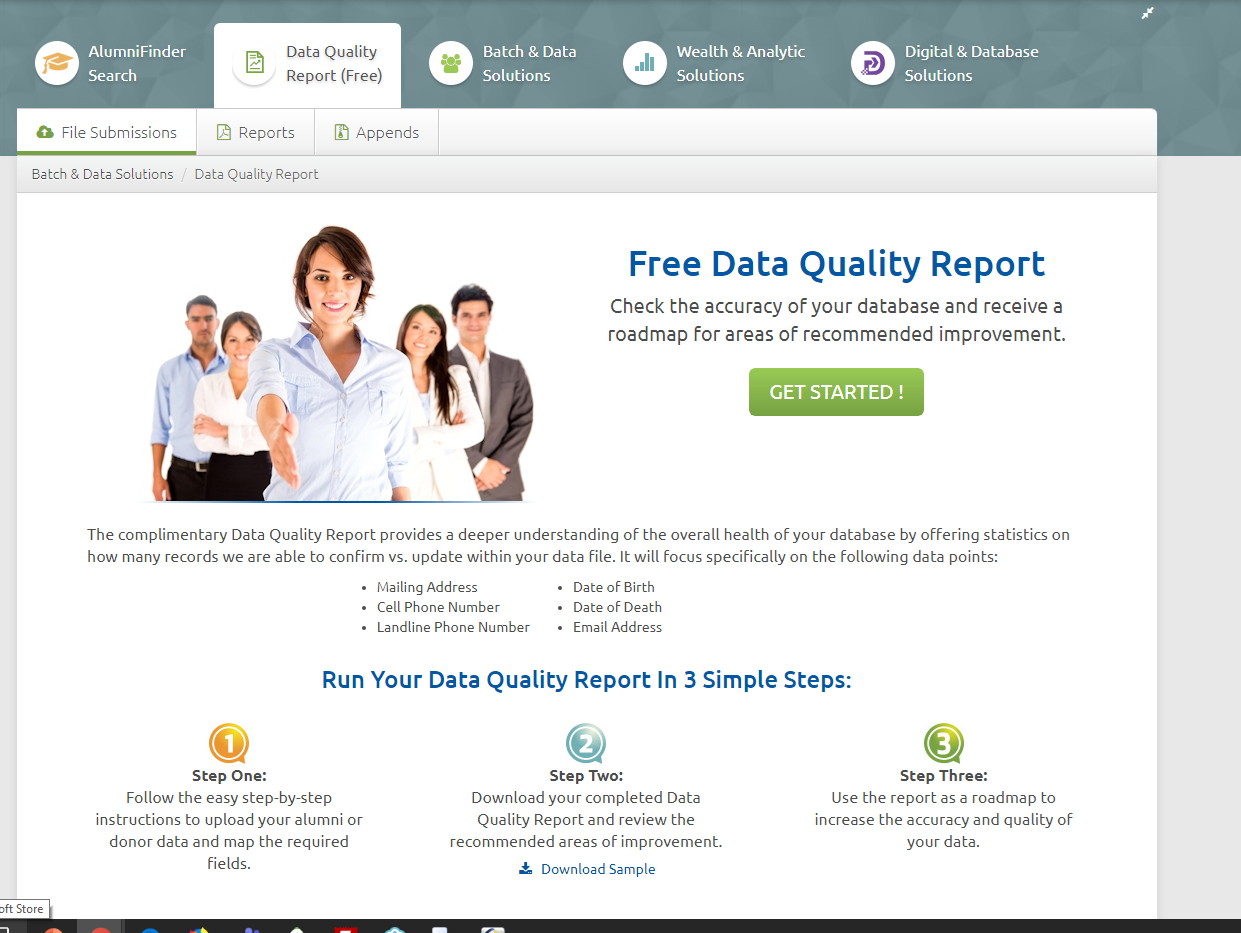
AlumniFinder’s complimentary Data Quality Report provides a deeper understanding of the overall health of your database. By offering statistics on how many records we can confirm and/or update, , you are able to identify areas that need improvement. The Data Quality Report focuses specifically on the following data points:
- Mailing Addresses
- Cell Phone Numbers
- Landline Phone Numbers
- Dates of Birth
- Dates of Death
- Email Addresses
Create your own Data Quality Report in just a few simple steps.
Upload Your File
Please review the upload screen to ensure that your file is aligned to the requirements outlined for:
- Minimum Field Inputs
- File Types
- File Sizes
- Input Data
Upload your alumni or donor data and click “Next” to continue. Next, you will map the fields required to submit your file.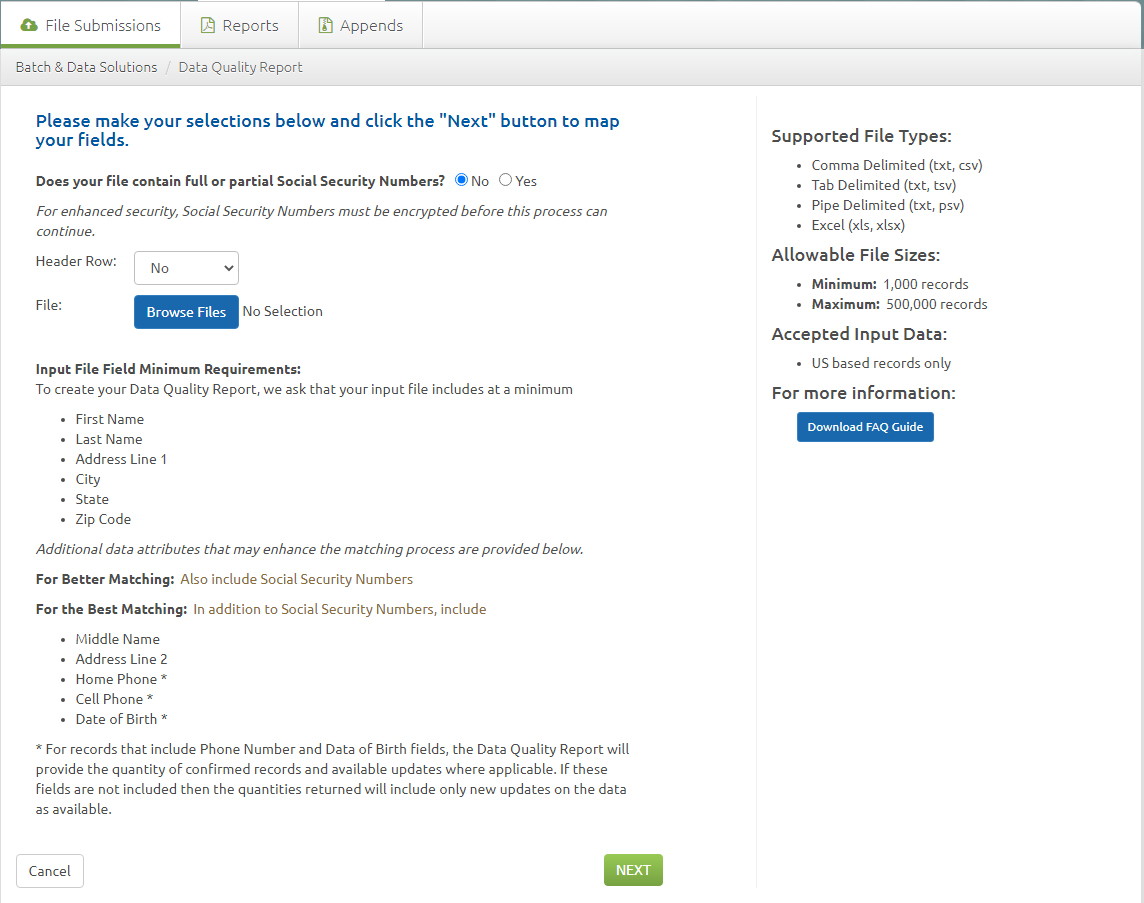
On the final screen, select “Accept the Terms and Conditions” and submit your file for processing. Files will typically complete processing within 24 to 48 hours from submittal. You will receive your Data Quality Report via email. There, you can review the recommended areas of improvement.
Ordering a Data Quality Append
The data available for updates as identified in your Data Quality Report can be appended to your file. Obtaining this information will provide your organization with more accurate, actionable contact details for your alumni or donors. Ordering the information on AlumniFinder Online is easy!
- From the reports section, click on the Shopping Cart icon.
- Indicate your payment method, accept the terms and conditions, and then click “Submit” to process the append.
Download Your File
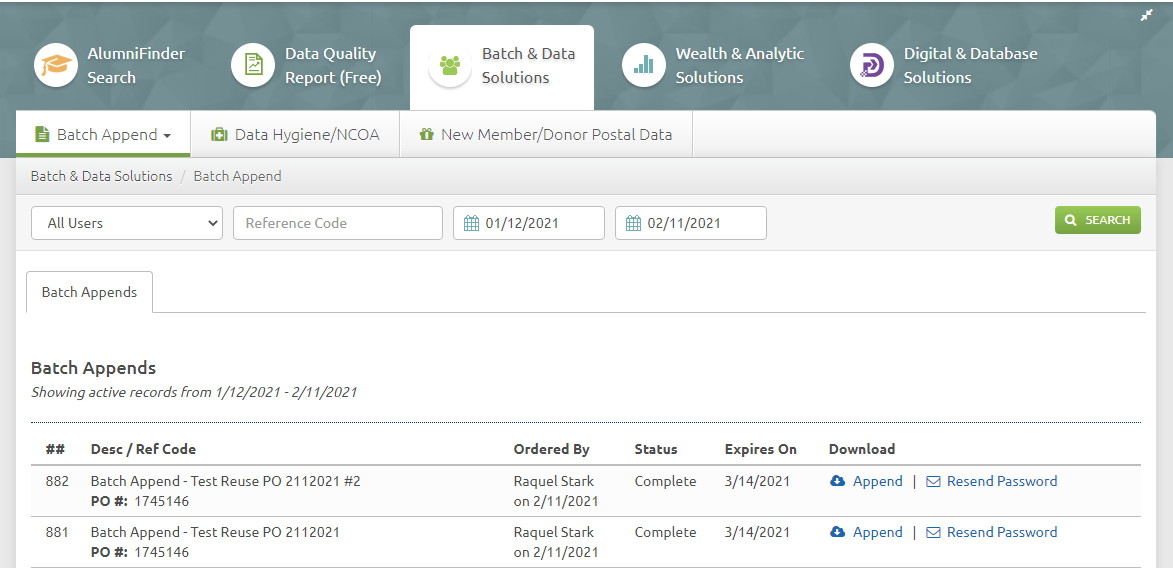
Files typically complete processing within 24 to 48 hours from submittal. You will receive an email notification that your file is ready. The email will contain your download password. To obtain the final file, you must be on the Data Quality Append tab and click the “Appends” option located under the Download section. The output file contains a resource document designed to guide you on the data appended to your file.
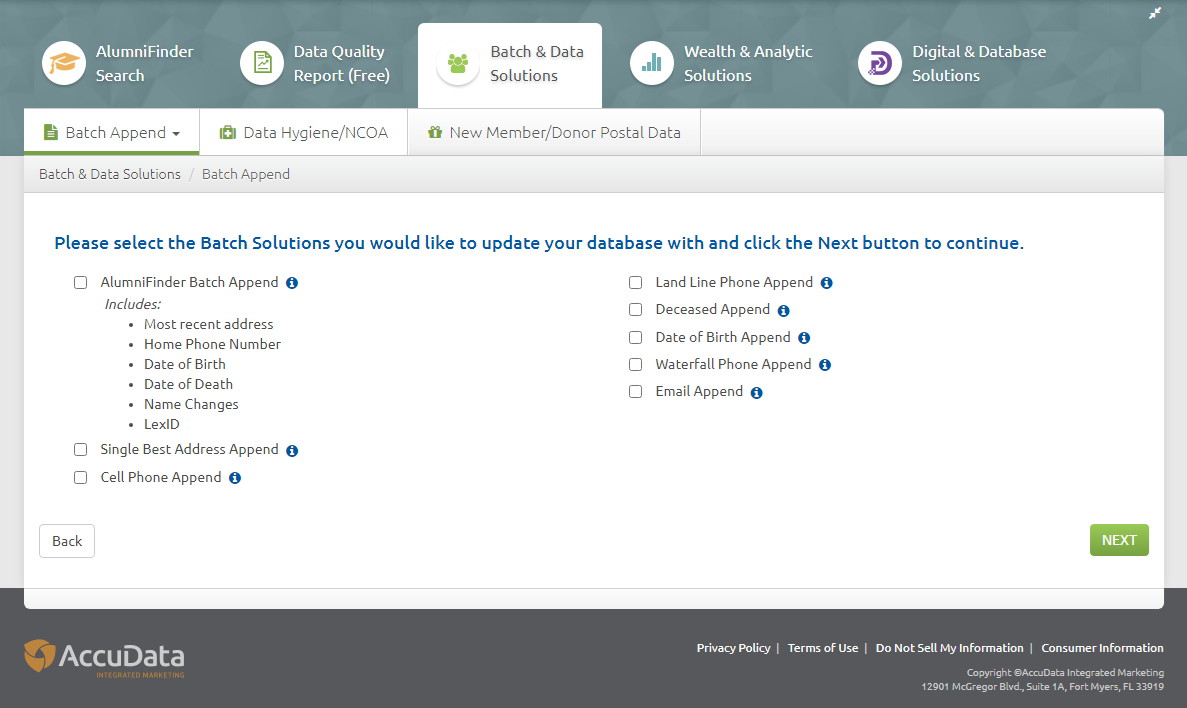
Updating your database with AlumniFinder Batch Services improves critical contact details so you can better communicate with your constituents. AlumniFinder Online’s Batch Append Services include the following update capabilities for your data:
- Address Updates
- Name Changes
- Telephone Numbers
- Emails
- Dates of Death
- Dates of Birth
- And more!
Select the type of information you would like to update and click “Next” to continue.
Upload Your File
Please review the upload screen to ensure that your file is aligned to the requirements outlined for:
- Minimum Field Inputs
- File Types
- File Sizes
- Input Data
Upload your alumni or donor data and click “Next” to continue. Next, you will map the fields required to submit your file. On the final screen, select your payment method, accept the terms and conditions, and submit your file for processing.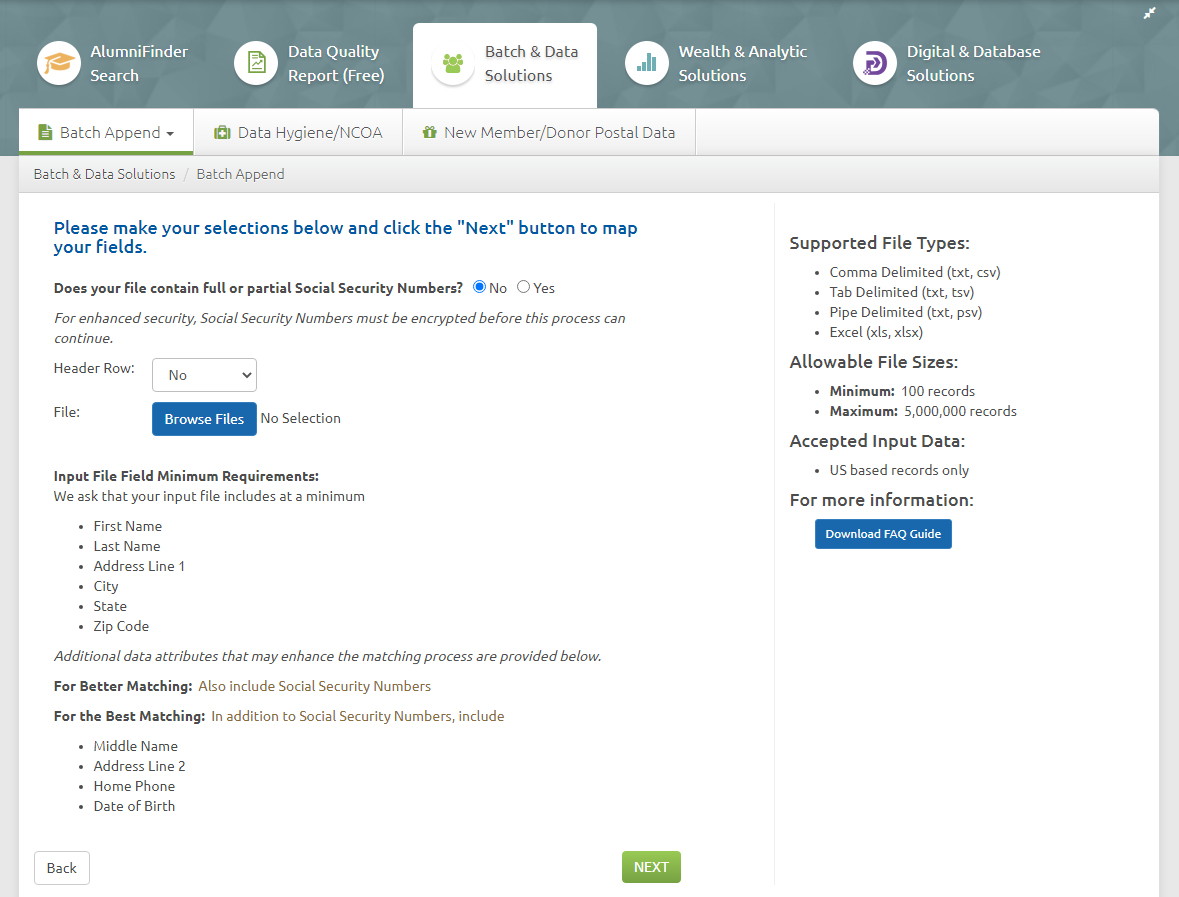
Download Your File
Files typically complete processing within 24 to 48 hours from submittal. You will receive an email notification that your file is ready. The email will contain your download password. To obtain the final file, click the “Appends” option located under the Download section. The output file contains a resource document designed to guide you on the data appended to your file.